define Columns and SEED data per campaign key
To start the process of creating a Seed data table, a campaign key must be selected. Each campaign key will likely have different column templates for holding the standard seed data and this is supported by the requirement to set up Seed data relating specifically to a campaign key.
Simply select the required campaign key from the drop-down option at the top left of the screen. This drop-down will display all campaign keys the currently logged in user has access to. Campaign keys must be configured prior to constructing the Seed data.
Once a campaign key is selected, the Seed configuration screen will display to allow the appropriate columns to be selected and populated.
Each campaign key will have a table of seed data that will be re-used in all seed implementations, the Manage column options allows the administrator to select and reorder the columns to be populated.
| Note: |
- The Manage columns dialogue will only display tables that are available for addition to the Seed data structure based on the selected campaign key.
- Parametric engineered columns are not available due to their unique data storage.
- Once the columns have been selected, an excel spreadsheet of Seed data can be uploaded to this structure. it is important that the order of columns in the admin page matches the order of columns in the excel spreadsheet. Re-order these here to match that structure.
|
- Select the Manage columns button to display the Manage columns dialogue
- Select columns from the left hand pane that will be populated with Seed data. These columns will then appear on the right hand pane allowing them to be re-ordered as required to display top to bottom in the desired order. Columns can be deleted by either de-selecting, or using the delete icon
- On completion of the desired structure, click Done which will add the specified columns to the Seed data table.
| Note: |
- The first column in the Seed data table is reserved for Seed List management.
|
Once the column structure has been defined for a campaign key, the actual Seed data can be imported using the Import options. The import process supports the use of Excel created .csv files which should be constructed with no header row. The import process will import a .csv file into the grid. The first column of the .csv file must contain at least one Seed List name, but each seed can be a member of multiple lists by simply adding a comma separated list in column 1. Alternatively for smaller Seed data, seed rows can be inserted manaully.
| Note: |
- Seed data should be supplied in an Excel constructed .csv format for optimal import.
- Data in the csv is pasted into the Seed table as it appears, it does not require column headers in the csv and does not perform any column header matching, so will simply insert the csv data into the created Seed table structure.
- Seed List names are used to group the Seeds together and it is the Seed List name that the marketer will use in the application so the .csv must contain at least one List name.
- Data is not stored until the Save option is selected.
- The Refresh icon at the top of the grid
 can be used at any time to cancel the import. Refresh will retrieve the most recently saved Seed data and display in the table. can be used at any time to cancel the import. Refresh will retrieve the most recently saved Seed data and display in the table.
|
- Prepare the .csv file to match the Seed table structure and populate with required Seed values
- Click import and browse to the defined .csv file. Note that on the first import, the file can also simply be dragged onto the grid to perform an import/paste process
- Select the .csv file and click open
- Review the produced table ensuring that the data displayed is correct.
- If incorrect simply repeat the above process. The Refresh icon at the top of the grid can be used at any time to cancel the import. Refresh will retrieve the most recently saved Seed data and display in the table.
- Once the data is correct click Save to save the Seed data and lists.
Example .csv
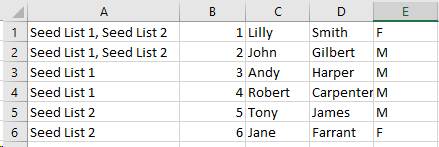
Once imported, this will create two seed lists, i.e. Seed List 1 and Seed List 2
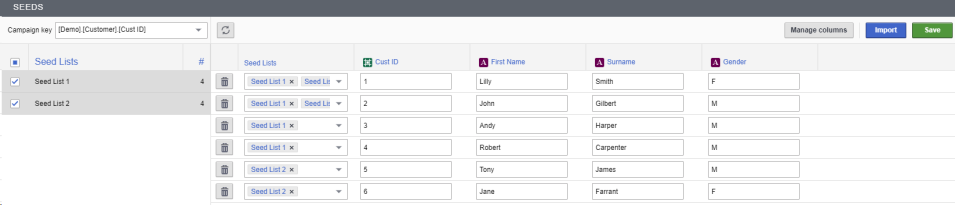 The Seed data can now be saved and the Lists will be available within the Campaign Designer application within the output elements. The Seed data can now be saved and the Lists will be available within the Campaign Designer application within the output elements.
Seed data can be added manually using the option 
Editing Seed Data
Seed data can be manually edited, added or removed at any time.
- Existing Seed data is editable by simply clicking into the grid cell and editing the value then clicking Save.
- Seed Lists can be added or removed by simply clicking into it and editing the value. Existing Seed List names can only be edited via a complete new import.
- New seed rows can be added by clicking the
 option. option.
- Seed rows are removed using the delete option.
- Save is always required to persist changes.
- The Refresh icon can be used to cancel any changes to revert to the previously saved.
|


