Sample database loads
To assist you in loading your data, an example database load is described based on the Family and Person demo databases. These databases are normally installed during a typical installation. If they have not been installed, re-run the installation process.
Procedure
- The first stage in the process is to manually create the Scripts directory, for the purpose of this exercise create a directory called Load Scripts on your C: drive.
C:\Load Scripts
- Open iLoader. The first step is creating the required directories and file structure and the default files for the load.
- From the iLoader Configure tab, click the Create Directory Structure icon and navigate to the location of your Scripts directory. Select the directory and click OK, this will create the Scripts directory structure.
- Click the Create Default Files icon to create the standard script files needed for the load, click OK.
The default directory and file structure has now been created.
On installation the raw data files are loaded into the Demo database directory.
- Ensure that your data tables PERSONDATA.DAT and FAMILYDATA.DAT are located in the LOADSCRIPTS\DATA directory created in the Create Directory Structure process described earlier.
- To check the files have been placed in the correct directory, click the Scripts tab and expand the Data directory, the PERSONDATA.DAT and FAMILYDATA.DAT should be visible in the directory. Highlight one of the files to display its contents in the right-hand pane and confirm that the files are fixed width.
- Now that the directory structure and the raw data are in place, we can begin to create the necessary scripts. Under the Scripts tab, click the Control folder in the left-hand pane.
- Click the
Table Declaration button. The Table Declaration wizard opens. Enter the following information for the Person Table:
- Table Definition File - enter Persontable.txt
- Data Source File - click the Browse icon … and select the Person data file: PersonData.dat.
- Format - FLAT
- Process Type - REFRESH
- Record Width - 81
- Load Date - enter a date or leave as the default of today's date
- Click OK to return to the Scripts tab where the table created is displayed in the right-hand pane.
- Click the
Table Declaration button again and enter the following information for the Family Table:
- Table Definition File - FileFamilytable.txt
- Data Source File - click the Browse icon … and select the Family data file FamilyData.dat.
- Format - FLAT
- Process Type - REFRESH
- Record Width - 127
- Load Date - enter a date or leave as the default of today's date
- Now that the input tables have been declared, the next step is to specify the number of fields each table contains and provide the appropriate values. In our example these are: field name, type, start position (offset) and width of each record.
The field name and values of the sample tables, Person table and Family table are specified below. These values must be set accurately in the Table Definition wizard.
- To access the Table Definition wizard, expand the Control folder in the left-hand pane to see the Person and Family tables. Click on the Person table to display its contents in the right-hand pane. Double-click anywhere in the right-hand pane or click the Table Definition button. The Table Definition wizard opens.
| Note: | In our sample database load we are importing fixed length (or flat) data files. The offset field in the above tables refers to the start position of each field in the table. For delimited files, the offset value is a sequential number from the top down indicating the position of each field in the table. |
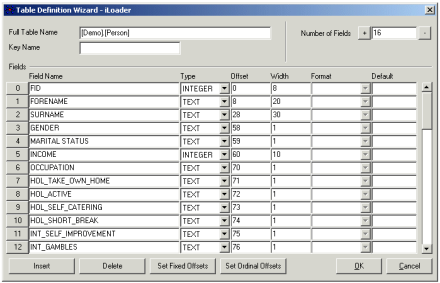
You can now increase or decrease the number of fields in the table. Click the + and - icons in the Number of Fields field. Enter the field information given in the table below for the Person Table. Click OK on completion.
| Field Name | Type | Offset | Width |
|---|---|---|---|
| FID | Text | 0 | 8 |
| Forename | Text | 8 | 20 |
| Surname | Text | 28 | 30 |
| Gender | Text | 58 | 1 |
| Marital Status | Text | 59 | 1 |
| Income | Text | 60 | 1 |
| Occupation | Text | 68 | 8 |
| Hol_Take_Own_Home | Text | 70 | 1 |
| Hol_Active | Text | 71 | 1 |
| Hol_Self_Catering | Text | 72 | 1 |
| Hol_Short_Break | Text | 73 | 1 |
| Int_Self_Improvement | Text | 74 | 1 |
| Int_Gambles | Text | 75 | 1 |
| Int_Goes_Out | Text | 76 | 1 |
| Int_Stays_In | Text | 77 | 1 |
Repeat the above process for the Family Table by entering the relevant values in the Table Definition wizard from the information in the table below.
| Field Name | Type | Offset | Width |
|---|---|---|---|
| FID | Text | 0 | 8 |
| Town | Text | 8 | 40 |
| County | Text | 48 | 40 |
| EASTING | Text | 88 | 9 |
| NORTHING | Text | 97 | 9 |
| Postal Area | Text | 106 | 2 |
| Members | Integer | 108 | 2 |
| Children | Integer | 110 | 2 |
| Bedrooms | Integer | 112 | 2 |
| Family Income | Text | 114 | 11 |
The next stage of the data load is to identify the location or destination of your imported database files. This done in the Management Console during the Project setup phase. See the Management Console user guide for a full description of setting up Projects.
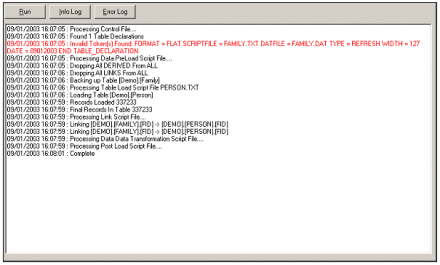
The final stage of the process is to run the database load. Click the Loader tab and click the Run button to initiate the database load. Load times vary and are dependent on the size of the database.
For our sample database input, a successful run would output the following information:
Results
Assuming there are no errors during the load, the process is now complete. If errors have occurred, these are displayed on screen in red.


